Field Notes D04
Connect to Azure AD from Azure Functions with a PowerShell Script
There are certain things to overcome when using Connect-AzureAD from a PowerShell script under Azure Functions by authenticating with a certificate. This article explains how to do it.
0 Prerequisites
Azure Functions has been deployed already.
1 Generate Certificate and Service Principal
To run Azure AD PowerShell commands, we need to connect to Azure AD first. Connect-AzureAD currently supports three methods to connect to Azure AD. Refer to Connect-AzureAD.
- By credential
- By CertificateThumbprint & ApplicationId
- By AadAccessToken & AccountId
Since we don’t want to store cleartext credentials in our Azure Functions app, the best choice here is to use a certificate.
To generate a self-signed certificate and associate it with an AAD application service principal, we can follow the steps below.
NOTE: Please replace YOUR_PASSWORD, YOUR_PFX_PATH and YOUR_APP_NAME with corresponding values.
# Login to Azure AD PowerShell With Admin Account
Connect-AzureAD

# Create the self signed cert
$currentDate = Get-Date
$endDate  = $currentDate.AddYears(1)
$notAfter  = $endDate.AddYears(1)
$pwd  = "YOUR_PASSWORD"
$thumb = (New-SelfSignedCertificate -CertStoreLocation cert:\localmachine\my -DnsName YOUR_DNS -KeyExportPolicy Exportable -Provider "Microsoft Enhanced RSA and AES Cryptographic Provider" -NotAfter $notAfter).Thumbprint
$pwd = ConvertTo-SecureString -String $pwd -Force -AsPlainText
Export-PfxCertificate -cert "cert:\localmachine\my\$thumb" -FilePath YOUR_PFX_PATH.pfx -Password $pwd

# Load the certificate
$cert  = New-Object System.Security.Cryptography.X509Certificates.X509Certificate("YOUR_PFX_PATH.pfx", $pwd)
$keyValue = [System.Convert]::ToBase64String($cert.GetRawCertData())

# Create the Azure Active Directory Application
$application = New-AzureADApplication -DisplayName "YOUR_APP_NAME" -IdentifierUris "https://YOUR_APP_NAME"
New-AzureADApplicationKeyCredential -ObjectId $application.ObjectId -CustomKeyIdentifier "YOUR_PASSWORD" -StartDate $currentDate -EndDate $endDate -Type AsymmetricX509Cert -Usage Verify -Value $keyValue

# Create the Service Principal and connect it to the Application
$sp = New-AzureADServicePrincipal -AppId $application.AppId

# Give the Service Principal Reader access to the current tenant (Get-AzureADDirectoryRole)
Add-AzureADDirectoryRoleMember -ObjectId 72f988bf-86f1-41af-91ab-2d7cd011db47 -RefObjectId $sp.ObjectId

# Get Tenant Detail
$tenant = Get-AzureADTenantDetail

# Now you can login to Azure PowerShell with your Service Principal and Certificate
Connect-AzureAD -TenantId $tenant.ObjectId -ApplicationId  $sp.AppId -CertificateThumbprint $thumb

# Output TenantId, AppId and Thumbprint to use in azure function's script
Write-Host "TenantId: "$tenant.ObjectId
Write-Host "AppId: "$sp.AppId
Write-Host "Thumbprint: "$thumb
2 Configure Azure Function to Use Certificate
To use the generated certificate to connect to Azure AD, we need to make the certificate available to Azure Functions from the Azure portal.
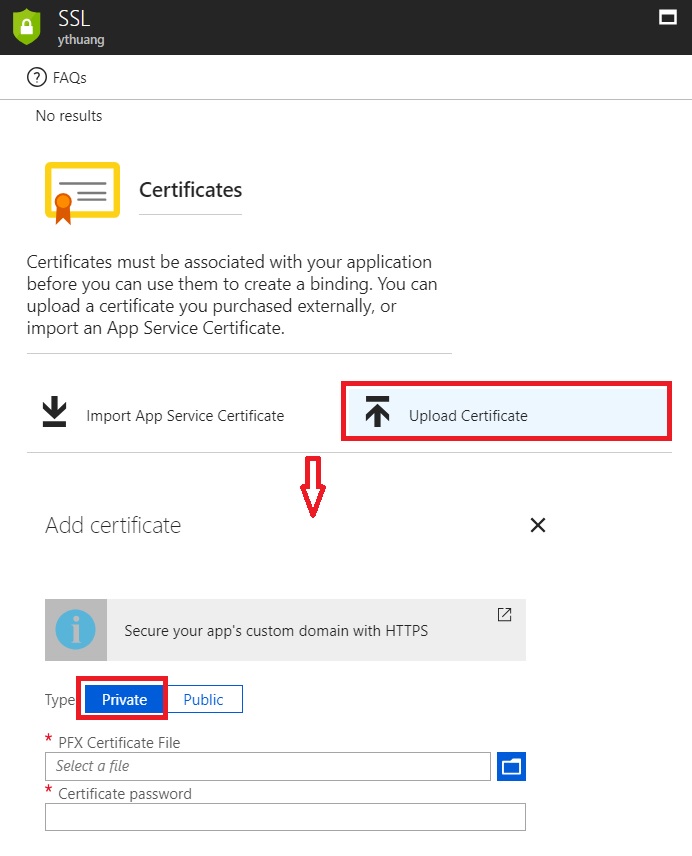
- YOUR_AZURE_FUNCTION->Platform features->SSL, click ‘Upload Certificate’ to upload the exported .pfx format certificate in Step 1
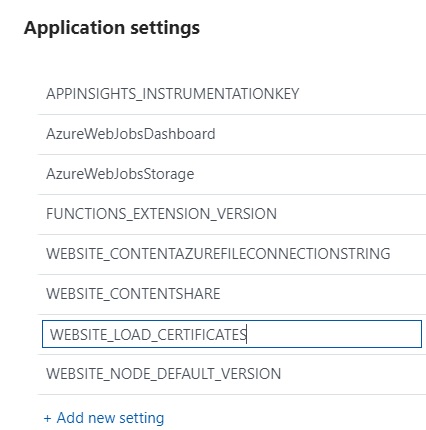
- YOUR_AZURE_FUNCTION->Platform features->Application settings->Add new settings, add a new setting with name called ‘WEBSITE_LOAD_CERTIFICATE’ and set its value to thumbprint of generated certificate.
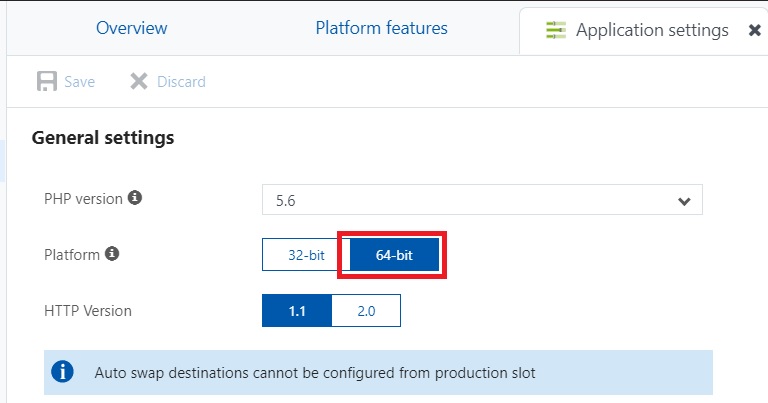
- YOUR_AZURE_FUNCTION->Platform features->Application settings->Platform, change to 64-bit.
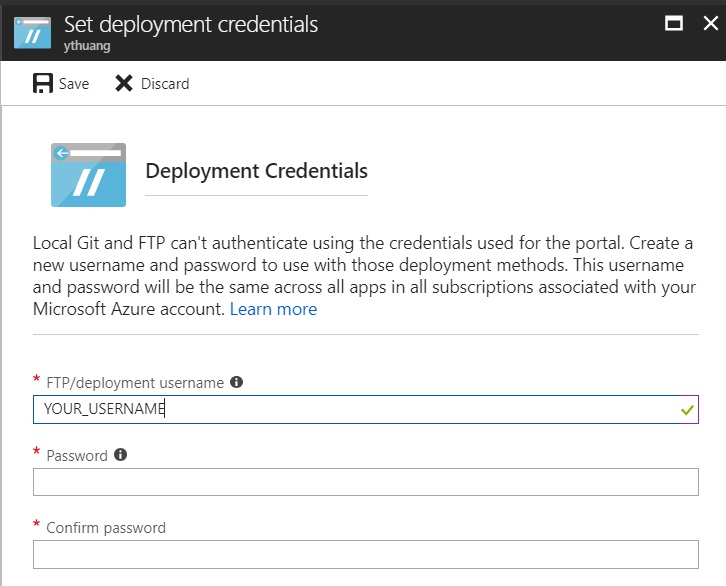
- YOUR_AZURE_FUNCTION->Platform features->Deployment credentials, set a credential to be used later with FTP deployment.
3 Copy AzureAD PowerShell Module to Azure Function
The Azure Functions hosting environment doesn’t provide the AzureAD PowerShell module by default. To use the AzureAD PowerShell module, we need to ‘INJECT’ it into the Azure Functions host environment. Basically, we need a central place to store the AzureAD PowerShell module and load it from this central place. We will use wwwroot\YOUR_FUNCTION_NAME as the central place.
- First, let’s store a copy of the AzureAD module from a local PowerShell environment. From a Windows machine, run:
Save-Module AzureAD -Repository PSGallery -Path C:\Temp- A folder named AzureAD will be created under C:\Temp and all AzureAD related files will be downloaded into this folder.
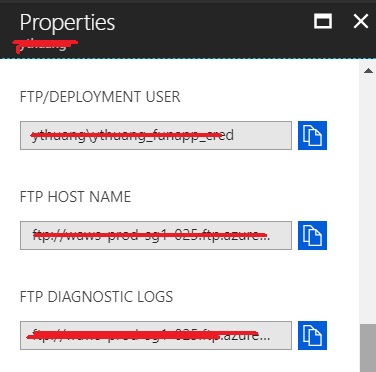
- Now copy the AzureAD module to the Azure Functions hosting environment. From YOUR_AZURE_FUNCTION->Platform features-Properties, find the FTP URL of ‘FTP Host Name’.
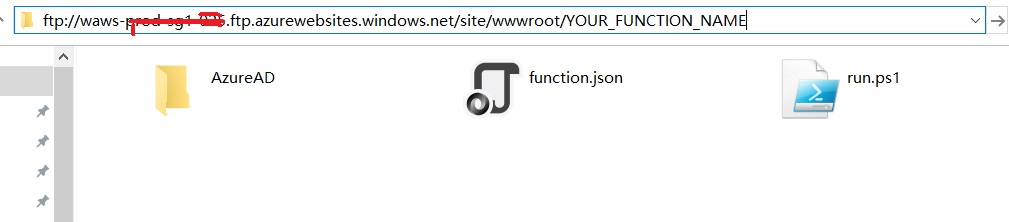
- From Windows Explorer, access the ‘FTP Host Name’ URL with the deployment credential configured previously in Step 2.
- Navigate to site/wwwroot/YOUR_FUNCTION_NAME then copy AzureAD into it
4 Write PowerShell Script from Azure Function to Connect to Azure AD
With the configurations and setup from Step 1, Step 2, and Step 3, we are ready to run AzureAD PowerShell scripts from Azure Functions now. Here are the steps to create a PowerShell Azure Function and call Connect-AzureAD.
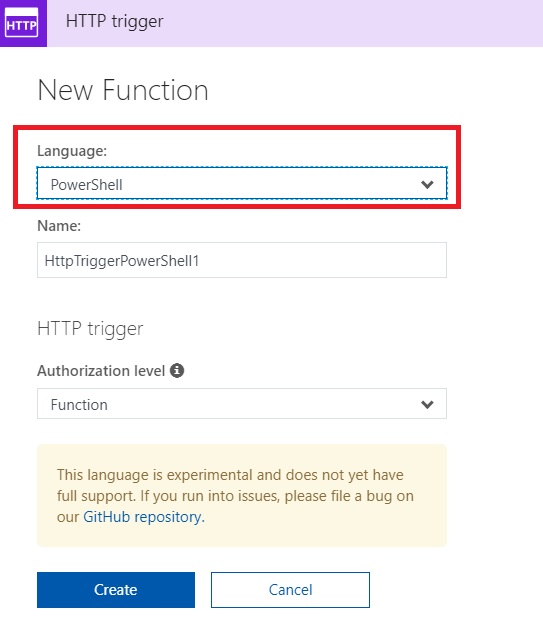
From the Azure portal, create an Azure PowerShell function.
Then copy/paste the code snippet below into it.
Write-Output "PowerShell function executing at:$(get-date)";

$FunctionName = 'YOUR_FUNCTION_NAME'
$ModuleName = 'AzureAD'
# Replace module version with
$ModuleVersion = '2.0.1.10'
# Your Aad Tenant Id
$TenantId = 'YOUR_TENANT_ID'
# Your Application Service Principal Id
$AppId = 'YOUR_APP_ID'
# Your Certificate Thumbprint
$Thumbprint = 'YOUR_THUMBPRINT'
# Import AzureAD PS module
$PSModulePath = "D:\home\site\wwwroot\$FunctionName\$ModuleName\$ModuleVersion\$ModuleName.psd1"
Import-module $PSModulePath

# Connect to AAD
Connect-AzureAD -TenantId $TenantId -ApplicationId $AppId -CertificateThumbprint $Thumbprint
Write-Output "PowerShell function executed at:$(get-date)";
Note:
- YOUR_FUNCTION_NAME needs to be replaced with real azure function name.
- YOUR_TENANT_ID, YOUR_APP_ID, and YOUR_THUMBPRINT need to be replaced as well. This information can be found from Step 1’s output.
- Depending on the exported AzureAD module version, $ModuleVersion needs to be changed. To check the AzureAD module, check the subfolder under the AzureAD folder; the subfolder’s name is the module version.
The PowerShell Azure Function should be ready now. Click the ‘Run’ button, and the output should look like the following.
2018-05-30T10:03:59  Welcome, you are now connected to log-streaming service.
2018-05-30T10:04:22.488 [Info] Function started (Id=386cd8a7-4e0b-4120-a669-353b28527ab3)
2018-05-30T10:04:22.581 [Info] PowerShell function executing at:05/30/2018 10:04:22
2018-05-30T10:04:23.675 [Info] Microsoft.Open.Azure.AD.CommonLibrary.PSAzureContext
2018-05-30T10:04:23.675 [Info] PowerShell function executed at:05/30/2018 10:04:23
2018-05-30T10:04:23.675 [Info] Function completed (Success, Id=386cd8a7-4e0b-4120-a669-353b28527ab3, Duration=1185ms)