Cloud Native C14
Deploy Traefik2 Ingress with cert-manager and Azure AD Authentication
This article discusses how to integrate your application with Traefik2 for Azure AD authentication, automatic certificate generation, and multiple Traefik instances in the community version.

Note (May 2026): This article was written for Traefik 2.2 and cert-manager v0.14-era APIs (
cert-manager.io/v1alpha2). Current Traefik, cert-manager, Kubernetes Ingress, and Microsoft Entra ID (formerly Azure AD) configuration patterns have changed. Use the design as a reference, but update manifests and Helm commands to current versions before applying them.
0 Define the problem
The requirement is simple. I’d like to:
- Deploy the latest Traefik version (2.2 at the time of writing) in my environment so that I can try new features
- Support an Azure AD authentication proxy (similar to oauth2_proxy) to protect my website
- Use Ingress instead of IngressRoute (Traefik) so I have the flexibility to switch between different ingress controllers
- Support automatic certificate generation.
- Scale out Traefik pods to support load balancing
After spending a few hours researching and testing, here is the result I came up with:
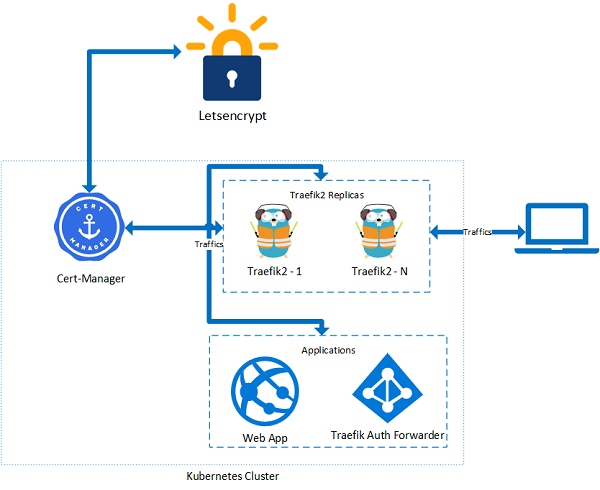
- AAD authentication can be achieved by using Traefik Forward Auth; refer to this link.
- Traefik supports automatic certificate generation but is limited to one replica, so the solution here uses cert-manager plus Traefik.
- Traefik 2.2 adds Ingress annotations back, so I am going to use Ingress annotations on the Ingress object. Details can be found from this link.
1 Solution
Here are the detailed steps.
1.1 Deploy traefik 2
The Helm chart is available from this link. By default, this chart exposes Traefik web and websecure ports on 8000 and 8443. Because we are creating an internet-facing web app/website, we need to override those settings to 80 and 443. The configurations entrypoints.web.http.redirections.entrypoint.to=websecure and entrypoints.web.http.redirections.entrypoint.scheme=https force all HTTP traffic to redirect to the HTTPS port. The configuration providers.kubernetesingress.ingressclass=traefik2 defines our Ingress class as traefik2, which is used in the Ingress annotation so cert-manager can decide which Ingress controller it should connect to.
helm install traefik traefik/traefik -n=traefik --set="additionalArguments={--providers.kubernetesingress,--providers.kubernetesingress.ingressclass=traefik2,--metrics.prometheus=true,--entrypoints.web.http.redirections.entrypoint.to=websecure,--entrypoints.web.http.redirections.entrypoint.scheme=https}",ports.web.port=80,ports.websecure.port=4431.2 Deploy and configure cert-manager
If cert-manager hasn’t been deployed, use the following command to deploy it:
kubectl apply --validate=false -f https://github.com/jetstack/cert-manager/releases/download/v0.14.1/cert-manager.yaml
Refer to link
NOTE: At the time of writing, cert-manager Helm 3 deployment still seems to have issues with namespace deletion because the CRD webhook can fail.
Once cert-manager is deployed, we need to define our ClusterIssuer to support the Traefik annotation. Use the template below and run kubectl apply -f cluster_issuer_traefik2.yaml to add our own Traefik2 ClusterIssuer.
# filename cluster_issuer_traefik2.yaml
apiVersion: cert-manager.io/v1alpha2
kind: ClusterIssuer
metadata:
  name: letsencrypt-staging-traefik2
spec:
  acme:

    # You must replace this email address with your own.
    # Let's Encrypt will use this to contact you about expiring
    # certificates, and issues related to your account.
    email: yourself@yourdomain.com

    # ACME server URL for Let’s Encrypt’s staging environment.
    # The staging environment will not issue trusted certificates but is
    # used to ensure that the verification process is working properly
    # before moving to production
    server: https://acme-staging-v02.api.letsencrypt.org/directory

    privateKeySecretRef:
      # Secret resource used to store the account's private key.
      name: letsencrypt-secret

    # Enable the HTTP-01 challenge provider
    # you prove ownership of a domain by ensuring that a particular
    # file is present at the domain
    solvers:
    - http01:
        ingress:
            class: traefik2
---

apiVersion: cert-manager.io/v1alpha2
kind: ClusterIssuer
metadata:
  name: letsencrypt-prod-traefik2
spec:
  acme:

    # You must replace this email address with your own.
    # Let's Encrypt will use this to contact you about expiring
    # certificates, and issues related to your account.
    email: yourself@yourdomain.com

    # ACME server URL for Let’s Encrypt’s staging environment.
    # The staging environment will not issue trusted certificates but is
    # used to ensure that the verification process is working properly
    # before moving to production
    server: https://acme-v02.api.letsencrypt.org/directory

    privateKeySecretRef:
      # Secret resource used to store the account's private key.
      name: letsencrypt-secret

    # Enable the HTTP-01 challenge provider
    # you prove ownership of a domain by ensuring that a particular
    # file is present at the domain
    solvers:
    - http01:
        ingress:
            class: traefik2
1.3 Deploy application
This post assumes we already have our web app/website running in the “app” namespace. To integrate the application with Azure AD authentication, we need to register an application in Azure AD. To do that:
- Log in to Azure Portal and click Azure Active Directory in the side menu.
- Click App Registrations and add a new application registration:
Name:
Application type: Web app / API
Sign-on URL: https:///_oauth - Click the name of the new application to open the application details page.
Click Endpoints. Note down the “OpenID Connect metadata document” and remove “/.well-known/openid-configuration”; this will be the endpoint URL. For example, if the “OpenID Connect metadata document” is https://login.microsoftonline.com/12345678-1234-1234-1234-123456789123/v2.0/.well-known/openid-configuration, then the endpoint URL will be https://login.microsoftonline.com/12345678-1234-1234-1234-123456789123/v2.0 - Close the Endpoints page to return to the application details page. Note down the “Application ID”; this will be the OAuth client ID.
- Click Certificates & secrets and add a new entry under Client secrets.
Description:
Expires: Never
Click Add then copy the key value, this will be the OAuth client secret.
Now, we are going to deploy the Traefik auth forwarder in the “auth” namespace and an Ingress object in the “app” namespace. Let’s create the two namespaces first.
kubectl create ns auth
kubectl create ns app
We also need to generate a secret to be used in Azure AD authentication, here is the script
CLIENT_ID=<Client ID in step 3>
CLIENT_SECRET=<Client secret in step 4>
ENDPOINT=<Endpoint in step 2>
RANDOM_SECRET=<Some random string>

cat <<EOF > azuread.yaml
apiVersion: v1
data:
  client_id: $(echo -n $CLIENT_ID | base64 --wrap=0)
  client_secret: $(echo -n $CLIENT_SECRET | base64 --wrap=0)
  endpoint: $(echo -n $ENDPOINT | base64 --wrap=0)
  random_secret: $(echo -n $RANDOM_SECRET | base64 --wrap=0)
kind: Secret
metadata:
  name: azuread
  namespace: auth
type: Opaque
EOF
Run kubectl apply -f azuread.yaml to create the secret.
Now we are all set. To integrate the application with Azure AD authentication and Traefik, we need to deploy the Traefik auth forwarder and create Ingress objects.
The template is attached below and requires a little customization first. Change “auth.yourdomain.com” to the real domain name created for the Traefik auth forwarder, and change “app.yourdomain.com” to your real app domain name. Make sure both auth.yourdomain.com and app.yourdomain.com point to the external load balancer IP address of the Traefik service. To get the Traefik service external IP, you can run:
k get svc -n=traefik
NAME      TYPE           CLUSTER-IP       EXTERNAL-IP     PORT(S)                      AGE
traefik   LoadBalancer   10.106.236.114   20.44.210.X   80:32095/TCP,443:32616/TCP   4d17h
Note down EXTERNAL-IP and make sure that, in your DNS domain, both “auth.yourdomain.com” and “app.yourdomain.com” point to EXTERNAL-IP.
Then apply all those configurations with kubectl apply -f app_auth_all_in_one.yaml to create the Traefik auth forwarder and two Ingress objects: one used to handle Azure AD authentication (auth-ingress), and another used to handle web app/website traffic (app-ingress).
# filename app_auth_all_in_one.yaml
apiVersion: apps/v1
kind: Deployment
metadata:
  labels:
    app: traefik-forward-auth
  name: traefik-forward-auth
  namespace: auth
spec:
  replicas: 1
  selector:
    matchLabels:
      app: traefik-forward-auth
  template:
    metadata:
      labels:
        app: traefik-forward-auth
    spec:
      containers:
        - name: traefik-forward-auth
          image: thomseddon/traefik-forward-auth:latest
          ports:
            - containerPort: 4181
              protocol: TCP
          env:
            - name: DEFAULT_PROVIDER
              value: "oidc"
            - name: PROVIDERS_OIDC_ISSUER_URL
              valueFrom:
                secretKeyRef:
                  name: azuread
                  key: endpoint
            - name: PROVIDERS_OIDC_CLIENT_ID
              valueFrom:
                secretKeyRef:
                  name: azuread
                  key: client_id
            - name: PROVIDERS_OIDC_CLIENT_SECRET
              valueFrom:
                secretKeyRef:
                  name: azuread
                  key: client_secret
            - name: SECRET
              valueFrom:
                secretKeyRef:
                  name: azuread
                  key: random_secret
            - name: COOKIE_DOMAIN
              value: app.yourdomain.com
            - name: AUTH_HOST
              value: auth.yourdomain.com
            - name: LOG_LEVEL
              value: trace
          resources:
            limits:
              memory: "256Mi"
              cpu: "200m"
---
kind: Service
apiVersion: v1
metadata:
  name: traefik-forward-auth
  namespace: auth
spec:
  selector:
    app: traefik-forward-auth
  ports:
    - name: http
      port: 80
      targetPort: 4181
      protocol: TCP
---
apiVersion: traefik.containo.us/v1alpha1
kind: Middleware
metadata:
  name: azuread
  namespace: auth
spec:
  forwardAuth:
    address: http://traefik-forward-auth.auth
    authResponseHeaders:
      - X-Forwarded-User
---
apiVersion: extensions/v1beta1
kind: Ingress
metadata:
  annotations:
    kubernetes.io/ingress.class: traefik2
    cert-manager.io/cluster-issuer: letsencrypt-prod-traefik2
    traefik.ingress.kubernetes.io/router.entrypoints: web,websecure
    traefik.ingress.kubernetes.io/router.tls: "true"
    traefik.ingress.kubernetes.io/router.middlewares: auth-azuread@kubernetescrd
  name: auth-ingress
  namespace: auth
spec:
  rules:
  - host: auth.yourdomain.com
    http:
      paths:
      - backend:
          serviceName: traefik-forward-auth
          servicePort: 80
        path: /
  tls:
  - hosts:
    - auth.yourdomain.com
    secretName: auth-tls
---
apiVersion: extensions/v1beta1
kind: Ingress
metadata:
  annotations:
    kubernetes.io/ingress.class: traefik2
    cert-manager.io/cluster-issuer: letsencrypt-prod-traefik2
    traefik.ingress.kubernetes.io/router.entrypoints: web,websecure
    traefik.ingress.kubernetes.io/router.tls: "true"
    traefik.ingress.kubernetes.io/router.middlewares: auth-azuread@kubernetescrd
  name: app
  namespace: app
spec:
  rules:
  - host: app.yourdomain.com
    http:
      paths:
      - backend:
          serviceName: app
          servicePort: 80
        path: /
  tls:
  - hosts:
    - app.yourdomain.com
    secretName: app-tls
A brief explanation of the template:
- The forwardAuth middleware is used to delegate authentication to an external service; in our case, it is traefik-forward-auth. For details, please refer to this link.
- Traefik 2.2 reintroduces annotations. To use the middleware in Ingress, we need to use
traefik.ingress.kubernetes.io/router.middlewares: <namespace>-<middleware\_name>@kubernetescrd. That’s why we need to add “auth-” before the “azuread” middleware, so the completed name will be “auth-azuread@kubernetescrd”.
Now you should have Traefik as an edge router and Azure AD authentication protecting your application.